Post Subject: A Modder's Guide To Acrylic
Posted on: May 25, 2008
Introduction
For most of you who know me and my particular modding tastes, I'm about to say something that's painfully obvious:
I love acrylic.
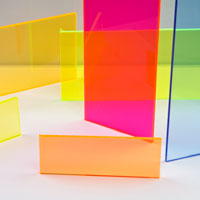
There, I said it. My name is Ryan Armstrong, and I'm an acrylic addict. I can't get enough of the stuff. It can be opaque or transparent, coloured or clear, thick or thin. It can be bent, it can be cut, and it can be fused together like there was no joint at all. It can be sanded to translucency or flame polished until it's crystal clear. Acrylic and I have had a love affair since 2001, and I'm about to let you in on how you can join in.
Why? Because acrylic is one of the most undervalued materials in the world of modding. "But I see it everywhere," you say, "How can it be undervalued?"
Well, I think it is – despite its ubiquitous presence in modding (from windows to reservoirs to block tops to whole cases), very few people actually bother to understand it as a material. Aluminium and steel information is abundant – cutting guides, fastening, brake bending, laser cutting. Maybe because it's a more even material, maybe because it seems like it needs specialised tools.
Acrylic avoids much of that, but unfortunately it also avoids the wealth of information. Extruded or cell cast? Cut with what? How do you get rid of scuffs and scratches? When and why does it crack, and how can that be prevented?
These questions (and more) will hopefully be answered in the following pages – it's time to give acrylic its proper fifteen minutes of fame.
Understanding the material
Before we can get into why acrylic does what it does, we have to understand what acrylic is. Acrylic is also known as PMMA, short for poly(methyl)-methacrylate, which is a plastic derived from refined petroleum and oxygen. It is not the same as polycarbonate, which is considerably harder to work with and is (at least for modders) an inferior product.
As a material, acrylic is often compared to glass for obvious reasons. It's about half the density of glass (and it is therefore much lighter), and translates about 98 percent of all visible light through it. It does not pass wavelengths smaller than 300nm through, so harmful UV rays are blocked from the start – but it can be treated to further prevent waves between 300-400nm (near UV). It is reflective from all surfaces (by about four percent naturally) due to its refractive index, so some prismatic effect is possible. This reflective property (much like the transparency property) can be adjusted by roughening the surface.
It scratches more easily than glass, and does not normally shatter. Instead, it breaks into large chunks via cracking when impacted. Though it is considerably more durable than glass, it cannot withstand strong pressure along its face – so it will handle a bit of bumping and bruising, but don't expect it to withstand a sledgehammer. However, not all acrylic is created equal, and the type you buy will have a lot to do with its durability later on.
Acrylic is made (for general consumption) in two ways:
* Extruded, where it is polymerised, melted (at about 250 degrees Celsius), poured through a die and air cooled; or,
* Cell cast, where it is polymerised and moulded at the same time in the mould.
The difference between the two products is like night and day – extruded, due to its manufacturing method, is considerably weaker and prone to splintering or cracking. This is because the polymer chains are stretched along the outside and oriented in one direction as the material pushes through the die. However, because all it requires is a big melting pot, a shaping die and some space, extruded acrylic is very cheap.
On the other hand, cell cast requires moulds for each piece being made. These moulds have to withstand the chemical properties of forming the polymer, and the finished acrylic must stay in them until cool. This means many moulds and a slower final product, making cell cast considerably more expensive. However, because the "lattice" of polymers happens naturally in its final shape, cell cast is considerably more durable, scratch resistant and splinter/shatter proof.
In all, it is worth every penny to go for the cell cast if you intend to cut or shape it in any serious way. If all you need is a flat piece, extruded might do the trick in a pinch – but don't say I didn't warn you!
Why use it?
Knowing what acrylic is makes it easy to see why we would use it as a perfect case building and modding material. It's softer than metals, so it's easier to work with. It's harder to break than glass and it won't shatter if it does, so you have little damage taking it place to place. And it's lighter than glass while being still transparent, which makes a lot of difference.
Better yet, because of its nature it can be milled, cut and machined easily with common wood tools, unlike glass or metal. And the veritable rainbow of colours, translucencies and reflectiveness make it easy to add to any mod. There are even pearlescent materials! Only glass can rival (or exceed) its colour spectrum – and glass is a very difficult animal to work with. I'll be covering that in a guide later this spring.
Acquiring the acrylic
So we know what acrylic is, how it's made and what type we need. Now, where do we buy it, and how do we know what's what?! Well, that's not an easy question – though there are some ground rules.
First of all, we have to be able to tell acrylic from polycarbonate. Acrylic is sold under the following brand names: Plexiglas, Lucite, and [/i]Perspex[/i] are all common brand names for acrylic. There are more obvious ones as well – Acrylex and Acrylite, for example.
Where to buy your acrylic is a much more difficult task. Unfortunately, I'm not well aware of the options that you guys in the UK have, but I've heard some good things about ThePlasticShop, which carries quite a good selection. For those of us in the States, a couple good places to try are Delvies Plastics and McMaster-Carr. I've had good experience with both.
Wherever you are, you can also take a look at US Plastics or TAP Plastics, which ship internationally quite easily. Several modders have had good experience with them.
What is highly important is to avoid your local hardware shops, unless both they and you know exactly what you're getting. Anybody who reads my work normally will know this is very out of character for me to say – but you should at least avoid big chains. Speciality or hobby stores are still a good bet, as they'll be able to catalogue order and thus assure you're getting properly cell cast acrylic. Much of what you find in your local mega-store is extruded – so it's best to avoid that.
Working with what you've got
Alright, so you have ordered your acrylic. You've got a couple neon pieces, a couple opaque blacks, maybe some clear...now what?
Now, it's time to take those lovely square or rectangular sheets and turn them into something useful! But how? Well, we can cut it, we can route it, we can bend it, we can do all sorts of things to acrylic that you couldn't do with metal – at least not without a full CNC router and lathe at your disposal...and how many of us have that?
The shaping ability is probably the second biggest reason to choose acrylic as your material of choice, outside of its colour range. After all, not everybody has a CNC or metal brake in their garage – in fact, most people don't.
So, let's take a look at just a few of the ways you can work with acrylic to make it fit your needs...
Cutting
Cutting acrylic can be a daunting task. Reading around online forums, you'll likely hear every horror story in existence. Cut too fast and melts. Cut with too big of a blade and it splinters or shatters. Cut extruded stuff and it turns to nothing more than spiderwebs and shards. And then there's the melting...
The very odd thing about all of this is that very few of these horror stories weren't preventable simply by choosing the right cutting tools, many of which you can find lying around in your nearby woodshop or garage. It really is fairly simple if you just plan ahead.
Before we begin, there is one cautionary note – the fumes given off by acrylic that's melting from a cut are very far from pleasant or healthy. Always wear proper safety equipment, which should include at the minimum a pair of safety glasses and a dust mask. If you're going to be doing a lot of it, wear a long-sleeve shirt as well so you're not covered with shards. Sometimes they're a tad hot and can fuse to arm hair (yes, I speak from experience).
The first thing you need when cutting acrylic is an idea of what kinds of cuts you will make. Much like dealing with wood, cutting acrylic is all about planning ahead.
* Straight cuts – For straight cuts, a table saw or circular saw with a fence are the best way to go. You should use a very fine-toothed blade such as a plywood panelling blade that fits your saw. If you have the option of speed control, slower is better.
* Short, curvy cuts – Short, curvy cuts are best done with a band saw or a scroll saw, depending on the size of curve you need to cut. If you're working with small pieces like lettering, drive bays, etc, a scroll saw is just about as close to perfect as you can get. For bigger pieces with fancy cutting, a band saw could be more appropriate. Either one should use a fine-toothed metal blade if possible.
* Long, curvy cuts – This is where acrylic starts to fall short. Many modern jigsaws are too fast for cutting acrylic without melting it. It's well worth looking into the possibility of trying to find a hybrid of the above methods to make these types of cuts.
As you can see, cutting acrylic is pretty much like cutting a hybrid between metal and plywood – tools for either one will work, but it's better to err towards plywood panelling when you can.
No sawblade that cuts acrylic should have a rake of any large degree, nor should teeth be anything but evenly spaced and short – so if your blade is wavy, large-toothed or varied, you need to find a new one. Otherwise, don't be surprised when the acrylic looks chewed up after the cut! There are such things as acrylic and plastic cutting blades which are (of course) optimally suited for the purpose, but I've honestly found that the above tips create excellent cuts with no special tools.
Rounding, routing, and other sundry tasks
Sometimes you're not happy with a piece of acrylic looking, well, like a piece of acrylic. Sometimes, it should have shape. And why not? What, you didn't think acrylic takes shaping well?
You can't exactly run a jack plane over the edge of it and expect to get very far (that poor plane), but a good old plunge router works wonders – particularly on a table. Set the bit depth to the thickness of your acrylic and you're on your way! Always make sure to route the exposed acrylic directly, though – don't let paper or plastic backing remain on it for this step.
Router bits aren't the cheapest thing in the world, but if you already have them on hand then you can make some great edges on thicker acrylic. It's a technique that's not seen in many mods to date, and it's easy as can be!
If you need to round a corner, you should decide exactly how rounded it needs to be – a scroll saw is again the best tool for the job. However, if you have access to a drum sander, it's possible to round an edge slightly by using that. Don't try to go for some massive curve though, or you're likely to do one of two things – melt the acrylic, or go through a lot of sanding drums.
Really, sandpaper should only touch acrylic for one of two reasons, both of which aren't covered until you flip the page. I've tried it on a big corner once when I was without access to my scroll saw, and found that I went through three sandpaper drums before I was done – just to find that I'd melted enough of the acrylic that the corner was now thicker than the rest of the piece. But if you need just a tiny little rounded edge, a drum sander will do the job.
Bending
Bending is the strong point for acrylic. There is no, and I repeat no, material that can bend like acrylic. A bent piece of acrylic is no weaker than a regular piece (usually), so it won't dent, snap or crack if you do the work patiently. And therein lies the biggest horror story of bending acrylic – patience.
Acrylic is usually bent in one of two ways – with a strip heater for sharp bends , or a heat gun for longer, gentle bends. I've seen people use everything from an oven to a hair dryer to an iron and do the job well – but honestly, heat guns are cheap, and if you work with acrylic for long then you will find one to be a necessity.
Strip heaters are rarely seen in modding because they're a specialty tool akin to a metal brake – unless you do this type of work frequently, odds are that you won't need one. But almost any bend can be done by a heat gun and a form *below* the bend.
If at all possible, the form should go the whole width and length of the bend (i.e., don't bend over two rails at the edges or the middle can sag). Clamp the acrylic without backing paper to the form, and begin passing the heatgun evenly over the top of the bend. As you see the acrylic droop over the form, move the heatgun down to the next part of the bend. Don't let the heatgun stay in one place too long, and try not to cover the same spot over and over.
By taking your time and bending "row by row," you'll find the acrylic takes to the form evenly and without cracking or odd warping.
Once we have all that gorgeously colourful, perfectly cut acrylic, it's time to look at how we're going to join pieces together. Whether you need to make a whole case or just a few parts, odds are that you're going to need to put more than one piece together.
With that in mind, let's take a look at how we tend to put things together:
* Glue
* Fasteners, or
* Fancy cuts (dovetail, biscuit).
The good news is, acrylic is probably the best compound you could ever use for the first two. The bad part is, if you try to use the third one then you'll likely be frustrated to ungodly levels.
But hey, let's be honest – we're not trying to weave the next Sangaku with acrylic. We could, but it would probably be a poor imitation and take flipping forever to build. And we're smarter than that, right? We'll pretend, at least...
So, though we may not be flooding the forums with fancy dovetail or mortise and tenon joints, let's take a look at the gluing and screwing that we're actually likely to do.
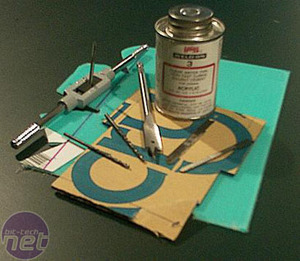
Gluing
Ah, now here is where acrylic can truly come into its own. No other material, and I mean no other material, is capable of truly fusing two pieces together and have them look as if it was one solid piece. This is an honour only given to acrylic, and only capable by practice, practice and practice. So before you go throwing out all those handy scrap pieces, why don't we work on them a bit, eh?
First, let's talk about what glues acrylic together. Few people know this, but superglue is actually one of the most potent bonding agents available for acrylic. I mean to tell you, this stuff works wonders. Slap it between two pieces put them together within a couple seconds and BAM! It's over, folks. It'll take a hammer to separate them.
Unfortunately, super-glue welds look like, well, crap. Sure, there's points where you can get away with them – if you're using all opaque pieces, for instance, it's silly to NOT use superglue. Nobody is going to see between the two pieces!
However, if you have a little more sightly weld or transparent pieces, you may wish to go for a slightly different technique. That's where the wonderful IPS Weld-On comes in. Weld-on is made of di- and tri-chloromethane compounds, which literally "unmake" the polymer for seconds at a time. As these compounds evaporate, the polymers re-adhere almost as if cell cast again. The joint becomes as if the piece were perfectly bent.
Oddly, that's rarely how it comes out looking. In normal practice with acrylic, people take two edges at ninety degrees, sandwich them together, and slap some IPS Weld on it. Then, they wonder why the joint is so clearly visible, when they read about acrylic being able to become seamless.
The reason is mostly in the angles because that edge that's still exposed was cut (roughly), meaning it's going to be hard to polish it away—at least not without some help. On top of that, no matter how close you think you are to perfectly levelled, odds are that you're not. But if you mitre the edges to each be 45 degrees through use of your handy table saw, you'll end up with a nearly invisible edge.
As a side note, here's a tip from Bill (one of the guys behind C3 cases) - extruded acrylic tends to glue better than cast acrylic. However, due to how its made, the thickness may actually vary a bit from one end of the sheet to the other, producing a slightly wavy edge. Just another one of those handy tips from the pros, that I didn't know either!
Screwing
We've covered the gluing, now how about the screwing? Yep, that's right, fasteners (in the case of acrylic, almost always screws) are the next biggest method of joining acrylic. And why not? They're cheap, readily available, and can look the business if you've got the right type of screws to go with your mod.
Screwing acrylic together is pretty easy, but you'd be surprised at how many modders manage to only screw the pooch. The devil is in the details, as they say. More often than not I see people slap a screw in, only to see spiderwebs in (or even a chunk come off of) their carefully laser-cut piece. What happened?
The answer, my friends, is in the prep-work. Acrylic is almost fibrous in nature, much like wood. The polymer chains are tremendously long, and often set together in "grains" that are invisible until you apply the wrong stresses to them. Always, always, always pre-drill, and use a countersink bit to help fit the head if you're not using a bolt. Drill deeper than you need so that the screw does not push through to undrilled acrylic. If you find your drill-bit grabbing, you can either use a little candle wax on the tip or grind the first edge down a bit – you'll be surprised what a difference it makes.
Then, please make sure to use a tapping kit! If you don't have one, they can be had from your local hardware store for not that much – or, look at ordering one online. Cheap taps are cheap, and they'll do the work you bought them for – likely saving you the cost of a bunch of new acrylic, which is far more expensive. If you go an expensive route, I'll assume you're using them for metal work as well – they do serve multiple purposes, after all.
If you don't want to tap, there's another idea that I picked up take a soldering iron and heat up brass inserts to fit into the holes. It will look like a professional job for a cost of next to nothing. The heat helps the brass insert fit in by softening the acrylic around it, which then cools to grip it tightly. This way, the insert is held fast so it doesn't slide out as you insert the screw, and help insure a tight fit without cracking the acrylic. Thanks for the great tip, Phinix!
As for where to screw (all jokes aside), try not to look at the edges where the "grain" is likely to run. Instead, look at using small cubes that you can build from your scrap (or buy a piece of extruded square rod – for this, it's ok). Screw a cube into each corner and you're all set! You can even weld the pieces together with IPS Weld-On and then screw them together – just for that long-lasting, survive an apocalypse feel.
Making it shine
Yeah, yeah, we mod because we love it… Of course we do. It's not because we like to show off our work – right? Ahem...nope, we're not at all interested in making it gorgeous so that we and those around us can drool over our accomplishments!
Riiiiiiight...
A good mod is little if it's not seen by anyone – even when we build it for all the right reasons. And in order to display our new acrylic babies to the world, well – we have to wipe the gunk off of them first.
And that brings us to the next major step in acrylic – we've cut it, we've joined it, and now we need to light it up. So, let's get to it, shall we?
Lighting
Acrylic can be lit several different ways, but the de facto standard nowadays is with embedded LED work. Granted, this is no way a black-and-white scenario – UV cold cathodes often still provide "flood"-style lighting in a case, making the UV-reactive acrylic glow like a Christmas tree.
The nice thing is, this is an easy way to make your acrylic work "pop." However, it has the drawback of looking like a 1980's teenager bedroom. Don't get me wrong, I see a lot of very nice UV effects – but more often than not, they just end up looking a bit over the top.
Subtle and diffuse backlighting and clear, visible point lighting from coloured LEDs offer a nice alternative, and both of these really shine when held fast in acrylic panels. But before we get to that, we should probably cover how to get both of these effects – and that revolves a lot around how you polish your finished work.
Polishing your jewels
How do you get acrylic edges to look smooth as glass? Here's a tip – leave the sander at home. No, seriously.
t is possible to get an acrylic edge fairly smooth and shiny by way of using sandpaper. The technique is similar to that of sanding a paintjob – wetsanding down to a very, very fine grit (P1000 and higher). For those not familiar with the technique, wetsanding involves just what it sounds like – sanding something that's already wet.
Once your bonds are completely dry, you wet both the surface to be sanded and the sandpaper, and use a soft foam or rubber block to apply very even pressure. A little soap in the water will help the lubrication. The material is then sanded with very light pressure, in order to even things out. Easy, huh?
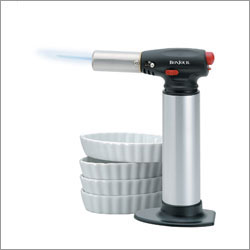
Here's a tip – leave the water and the sanding blocks to your next attempts at spray paint. For this round, we're going medieval on it – it's time to bust out the blowtorch (we can leave the pliers out of it).
Yep, I said blowtorch. It doesn't matter what kind – whether you have a Crème brûlée torch in the kitchen or a good old Bernz-O-Matic for sweating pipes, it'll work great. Go on, light that bad-boy up. Got it? Goooooooood... Now, wave it quickly over the edge to be finished – and there you are, a perfectly glass-like edge! If you're fast enough, you should be able to make almost any edge look like a professional job – remember to feather it into the other piece if you didn't read the last page and cut that 45 degree mitre!
For scratches on the actual panel, flame polish might get a little more risky. For that, take some metal polishing compound and give it a go – it should fix most scratches that aren't too deep.
Rubbing it raw
We've covered how to get things polished to a spit-shine, but what if you wanted the opposite to be true? Maybe you weren't looking for transparency from your project, and instead wanted a bit of translucency instead. Well, don't worry; we have that covered, too.
Go grab your nearest palm-sander and slap some fairly rough-grit sandpaper on there. No, not the P50 stuff – more like P120 or so. Apply liberally to both sides of the sheet of acrylic, if available. There you are – a nicely translucent panel.
Why both sides? Because people tend to move in rhythms and patterns, whether they mean to or not. By doing both sides of the acrylic, you're sure to create a fairly random distribution that will equal out to create an even spectrum of light. You can use this finish on nearly anything, but a couple great ideas include creating a vandal-resistant switch lookalike or a very diffusely lit motherboard tray. Of course, feel free to add your own ideas!
As you can gather, using this type of technique will create a very even spread of light due to diffraction for any light source behind or inside the panel. So, let's take a look at that finally....
Turning the lights on
If you're looking to mount LEDs to make acrylic light up brilliantly, look no further than your drill. Are you wondering if you read that right? Yep, I did say drill – because lighting up acrylic happens best when the light is inside the panel itself.
This may sound like odd logic to some and perfectly common sense to others, but let me explain for those following along at home exactly why this works. Remember how we've been describing acrylic as fibrous? Well, it is – at least to a point, as we previously discussed. However, unlike wood-grain, those fibres are transparent...almost fiberoptic in nature.
When light is behind these fibres, it has to shine through them, which involves a small amount of refraction and reflection, but very little retention. However, light that is passed across the fibres, from one end to the other, makes every edge light up like a headlamp – almost as if it was glowing itself.
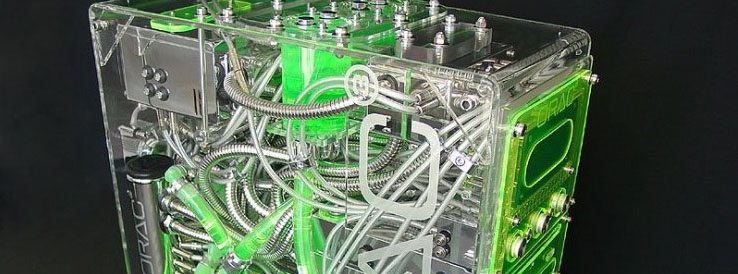
This technique is what gives many great mods like Orac their gorgeous lighting – the LEDs get mounted straight into the acrylic, and the whole sheet of plexi lights up around the edges. The same technique can be applied to whole panels if they're sanded, creating a diffuse, uniform light.
So how do you get the LEDs in there? That's where the drill comes in – simply drill a 5mm or 3mm diameter hole, insert a little hot glue, and push it in there. If you hide the edge where the LEDs are mounted, the light will spread to any edges of the panel as well as any screw holes, fan holes or other cuts or breaks in the plexi, illuminating them as if by magic.
This technique's been around since modding began practically, but I've still only seen it used for engravings and accent lights – the idea has a lot more applications that have still been ignored.
Some final words
I hope you've enjoyed this little treatise on what is probably my favourite material in all of modding. More to the point, I hope it's inspired some of you to look beyond the simple "Oooh, UV fluorescent with cathode" approach that acrylic mods seem to get.
Acrylic at its worst can be a garish mess of various transparent colours, glued together roughly or fastened poorly with screw-heads hanging out and cold cathodes everywhere. An LED fan here, a fluorescent something or other there, packed with a rat's nest of cabling.
However, at its best it can be the only case that goes from solid black opaque panel to perfectly translucent window with no visible seam. The reservoir can be built directly into the front panel, creating a "waterfall" look through careful bends. Wires can have clear or opaque channels formed that are fused directly into the shell, hiding the unattractive while flaunting the carefully planned.
Acrylic, my friends, is the only material where a case can be made to be genuinely just two pieces – the base, and some form of entry. It can be crafted to something that no metal, no wood, no anything can make.
It is truly, truly unique. And if you haven't taken the time to experiment with it as modders for anything more than a window here or a bay reservoir there (or even many of the pre-made cases, save the C3 brand and its meticulous attention to detail), I would say you're missing out. Hopefully, this article has inspired you to fix that, and I'll be seeing a new flood of original acrylic mods in the forums soon.
Very informative, Thank you! I will put some of this to use soon. I do have to ask, a "hot edge" do you know where to get them cheap? I would love to get one, for many future endevors with Plexy.
FreshWater
Core2 Quad Extreme QX96500-ES @ 3Ghz, 4gb Patriot DDR2-1066Mhz RAM, 4gb Intel Turbo Memory, 3x 500GB WD Blue drives, Samsung DVD-RW, GTX 560ti-1gb Gfx card.
Future Mods: none for Freshwater. Next build will be all new.
BCModder BCModderator?
Joined: Aug 8, 2006
Posts: 1488
Post Subject:
Posted on: May 26, 2008
I will have to read this when I'm actually more sober lol, Ive always been a bit of a metal cutter more then acrylic user but I would like to know more about it since it's cheaper then some other things such as modders mesh.
wow that was freakin informative (and awesome) i thought i knew alot about plex, but i was soooo wrong. thanks ryan. i am lucky enough to already own a heat gun, i need it to dry auto paint. but for anyone here looking for a reasonable one, mine was 30 dollars at advance auto, came with a stand built in and everything. i cant think of an application to bend some plexi, but i have a ton of it so maybe ill play around. it looks sexxy.
thanks again for the dope walk through.
**safety note**
try not to think of the price of the part your cutting in half.
I agree with abusiv. Awesome read, thanks a ton for the info. I also love plexi, but I never knew this much about it. Thanks again for all the advice and info, its really great to know as well as useful and helpful. I wish I had tonnes of cash. If I was a billionaire, I'd give the most hardcore users on this forum about 8000$ each. how does that sound? good? hm. there is a slight catch. I need to be a billionaire.
I was hoping for some time off to get XION moving again... with the robberies and what not it's been hell this summer... I can't even seem to find the motivation to work while at work heheheh... I still do my job... but that's about it, they've taken my want for over achieving.
Sorry I'm Not Modding Right now Because I'm dealing With Work and My Kids And I've Moved During The Summer.
Robberies? I still do my job... but that's about it, they've taken my want for over achieving. Don't All Employers Do That I know How That is.